|
|
||||||||||||||||||||||||||||||||||||||||||||||||||||||||||||||||||||||||||||||||||||||||||||||||||
| Specification | Access 2003 | FileMaker 7 |
| Max Fields/Table | 255 | unlimited - via GUI 1024 - via ODBC |
| Max FileSize | 2GB (1GB per table) |
8TB (8TB per table) |
| Max Tables | 2048 | 1,000,000 |
| Max Text Size - Character Field | 255 | 2GB |
| Max Text Size - Memo Field | 65535 | 2GB |
| Max Characters per Record | 2048 | unlimited |
| Max Column Name Length | 64 | 60 |
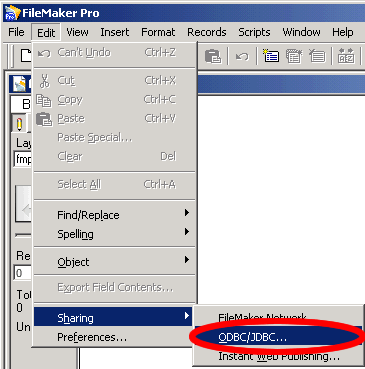
Technical Challenges with Migration
Some of the technical challenges with manual migrations of Access databases include Access to FileMaker data type mapping, changing of column names, dealing with large numbers of Access fields, and migrating images from Access to FileMaker 7.
• Access Field Name Issues - Access field names can exceed 60 characters in length and may consist of FileMaker 7 reserved words which would cause the table creation code to fail. FmPro Migrator handles these column name issues automatically when it generates the FileMaker 7 table creation script. FmPro Migrator automatically shortens excessively long Access column names to 60 characters, and suffixes reserved words with an underscore character. However you do have to watch out for situations in which duplicate column names may be created due to the field name truncation process.
• Large Numbers of Access Fields - Manually retyping up to 255 column names for multiple Access database tables into FileMaker is a time consuming and error prone process. FmPro Migrator makes an ODBC connection to the Access database in order to extract the names of all of the columns for each table within the Access database file. These column names are modified as needed and written into a table creation script which builds each of the Access database tables within the FileMaker 7 database.
• Migrating Access Memo Fields - Manually creating a CSV export file containing special characters or up to 65,535 characters of text from Access memo fields with often result in problems when importing the data. Special characters may get changed and text fields containing the export file delimiter characters may get misinterpreted during the file import process. The solution to this issue is amazing simple. Due to the robust importing capabilities within FileMaker, the data from Access can simply be imported via an ODBC connection to the Access database. All datatypes are retained and data contained within large text fields is inserted directly into the FileMaker 7 database table.
• Migrating OLE Object Fields From Access - Access OLE Object fields represent the equivalent functionality to FileMaker's Container fields. Access OLE Object fields can't be exported within CSV or tab delimited files. Once again, the solution to this challenge is to import the data into FileMaker via an ODBC connection to the Access database.
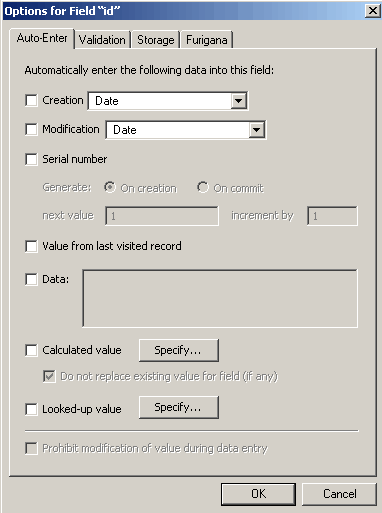
• Migrating Access Calculations - Access uses VBScript for the development of calculations and decision making within the database. VBScript is not available within FileMaker, so this functionality needs to be redesigned to use FileMaker scripts and calculation fields. The rich set of field entry and validation options within FileMaker simplifies the development process by replacing VBScript code with the selection of the appropriate Auto-Enter or Validation field option for each FileMaker field. This task is more reliable and faster than having to write, test and debug VBScript code within Access.
 |
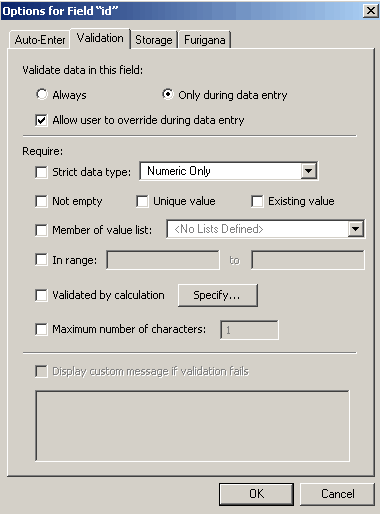 |
[Figure 1 - FileMaker 7 Field Options]
• Migrating Access Table Relationships - It is not possible to configure table relationships via an ODBC connection to a FileMaker 7 database. But this task is easily accomplished with the new relationships graph of FileMaker 7. Relationships are created between fields of tables, therefore each table may be migrated individually. Once all of the tables have been migrated to FileMaker 7, the relationships between the tables can be defined in the relationships graph of the Define Database dialog.
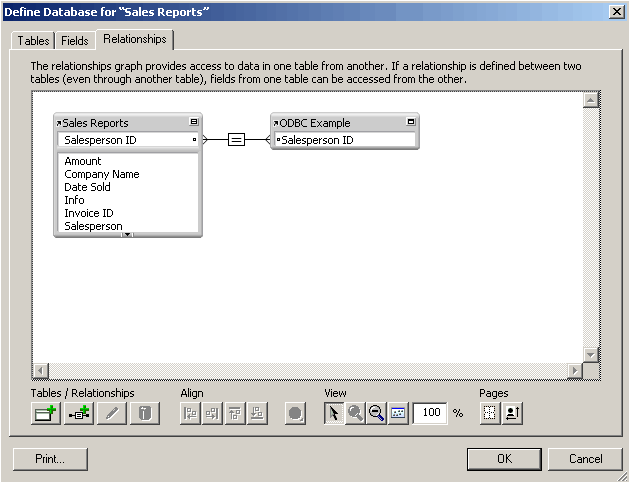
[Figure 2 - FileMaker 7 Relationships Graph]
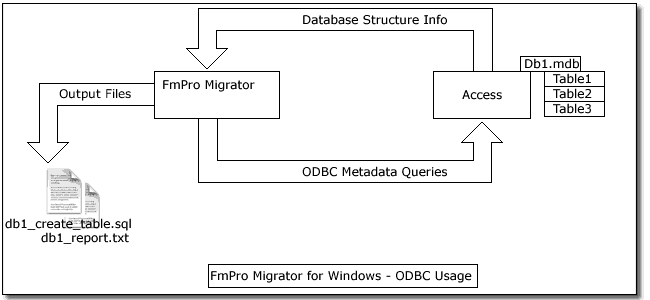
Using ODBC with FileMaker 7
Once FmPro Migrator gathers the metadata information from
the Access database, it creates a Perl program which re-creates the
Access database table(s) within the FileMaker 7 database. Perl makes
a good choice as a programming language for this task due to its strong
support for database connectivity through the DBI package. The Perl
DBI package provides a high-level database independent programming interface
which makes use of database dependent driver modules and manufacturer
supplied driver software to communicate with individual databases.
This means that ActiveState Perl needs to be installed on Windows along with the Perl DBI and DBD::ODBC modules. ActiveState Perl and the DBI/DBD::ODBC modules are available as open source software which can be downloaded at no charge. Once Perl has been installed on Windows, the following commands will install the DBI and DBD-ODBC Perl modules:
ppm

          PPM> install DBI

          PPM> install DBD-ODBC

          PPM> quit
Installing the FileMaker 7 ODBC Driver
FileMaker Pro 7 for Windows includes the DataDirect SequeLink ODBC driver which only allows a connection to the database from the localhost IP address - from the computer running the database. Unlike previous versions of FileMaker, the FileMaker ODBC driver is no longer automatically installed along with the database software. A separate ODBC installer is launched from the xDBC folder on the FileMaker 7 CD in order to install the ODBC driver. Launch the DataDirect setup.exe installer from the on the FileMaker 7 installation CD. The default installation options may be used during the install process.
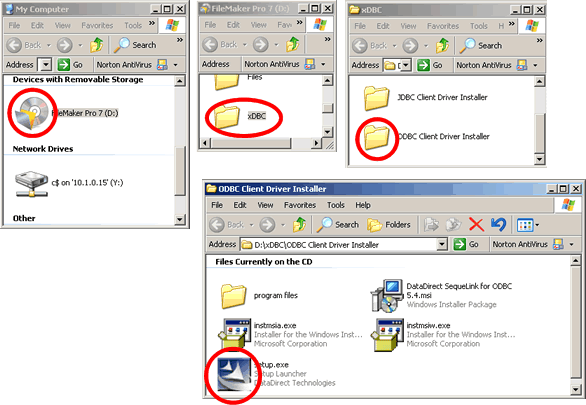
[Figure 3 - FileMaker 7 ODBC Installer]
Due to a problem with the ODBC installer, the DataDirect
SequeLink software needs to be installed twice in order to work correctly
on Windows.
Double-click the setup.exe installer again to remove the DataDirect
SequeLink software. Use the default options to de-install the software.
Double-click the setup.exe installer again to install the DataDirect
SequeLink software for the 2nd time. DataDirect 32Bit SequeLink will
now show up under the list of drivers within the the Microsoft ODBC
Administrator control panel.
The Access Example Database
The example database used for this article is a database named Example.mdb.
This database includes a wide selection of fields so that we can see
how the various data types get transferred to FileMaker 7. The following
table shows the Access data types and the compatible column types used
within the FileMaker 7 database.
|
Access Column Type |
FileMaker Column Type |
| Number | DECIMAL |
| Text | VARCHAR(255) |
| Memo | VARCHAR(64000) |
| Date/Time | DATE |
|
Long Integer |
DECIMAL |
| Byte | DECIMAL |
| Single | DECIMAL |
| Double | DECIMAL |
| Replication Id | DECIMAL |
| Currency | DECIMAL |
| Yes/No | VARCHAR(255) |
| OLE Object | BLOB (FileMaker Container Field) |
| Hyperlink | VARCHAR(64000) |
[Table 2 - Access and FileMaker 7 Data Types]
One caveat should be noted regarding the migration of Access OLE Object data to FileMaker container fields. The data is migrated successfully from Access OLE Object fields into FileMaker container fields, but images are not viewable within FileMaker while browsing the database. FileMaker 7 doesn't create a JPEG preview image for the container field unless the information is inserted into the record via the FileMaker graphical interface. You could however export the image data from Access prior to migrating the data by using one of the scripts created by FmPro Migrator, then import this data separately into FileMaker 7.
Getting Access Database Info
The first step in the migration process is to launch FmPro Migrator in order to specify the source database info. Select Access as the source database and FileMaker 7 as the destination database. The ODBC DSN for the source database will be used by FmPro Migrator to obtain metadata from the Access database. Either keep the default ODBC DSN names listed in FmPro Migrator or change them to match existing ODBC System DSNs on your computer. If it is necessary to log into the Access database, this login info may be entered here in FmPro Migrator or within the Access ODBC DSN.
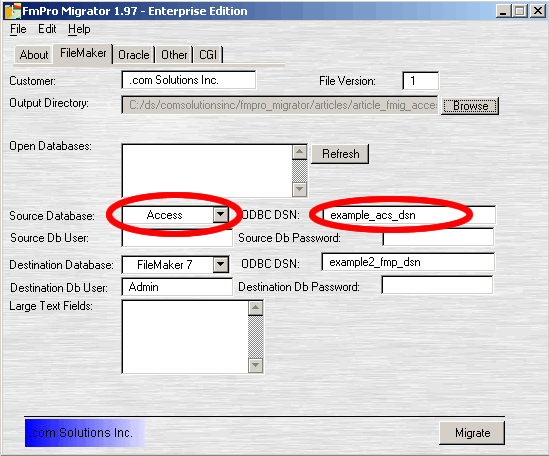
[Figure 4 - FileMaker Tab Parameters]
Since I frequently perform migration projects for customers, I change the contents of the Customer field to reflect their name. The name within this field is used to create the Copyright information within each generated script, thus keeping my customer's legal department happy. Click the browse button to select an output directory, since there will be 6 files created for each Access database table.
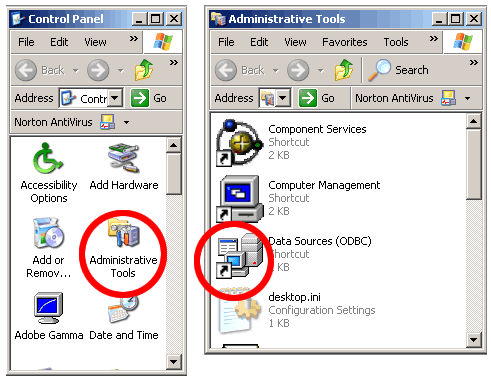
Create the Access ODBC DSN
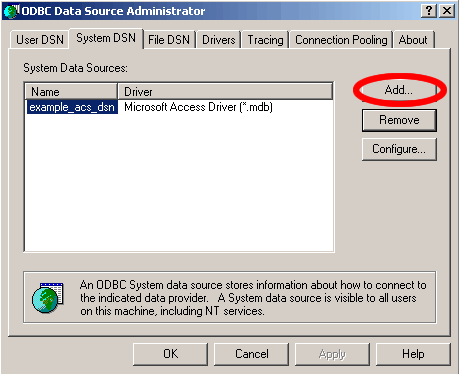
Open the Windows Data Sources (ODBC) Control Panel to
create a new System DSN for the Access database to match the ODBC DSN
name entered into FmPro Migrator for the source database. The Data Sources
(ODBC) control panel is located within the Administrative Tools folder
of the Windows Control Panel.
Note: With Windows XP, it may be necessary to select the Classic View
for the Control Panel in order to see the Administrative Tools folder.
 |
 |
[Figure 5 - Data Sources (ODBC) Control Panel]
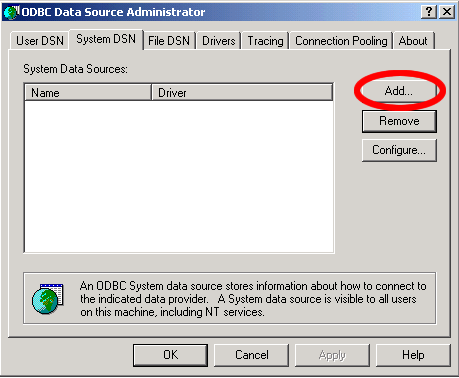
This ODBC DSN should be created as a System DSN, so click
on the System DSN tab, then click the Add button.
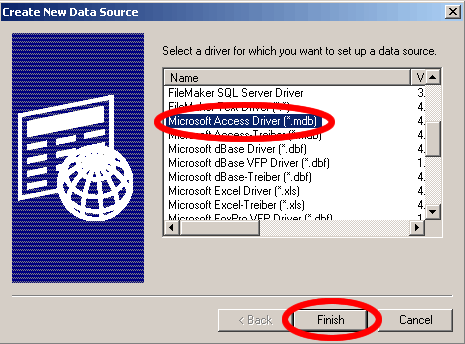
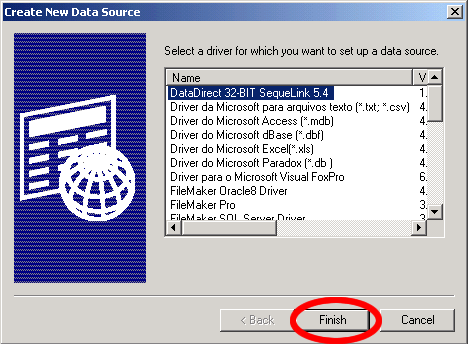
Select the Microsoft Access Driver, then click the Finish button.
 |
 |
[Figure 6 - Create New Access ODBC DSN]
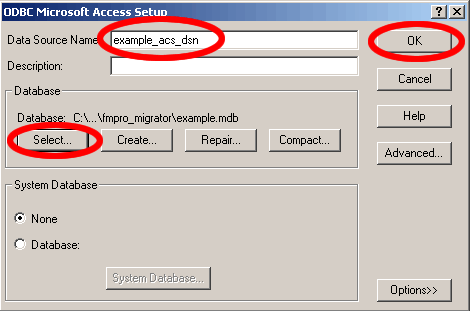
Enter the name of the ODBC DSN in the first field. This
name should exactly match the name entered into the Source Database
ODBC DSN field within FmPro Migrator. Click the Select button,
then select the Access database filename from your hard drive. Click
the Ok button.
Note: The Access database must not be open within Microsoft Access
while selecting the filename in this ODBC dialog.
[Figure 7- Enter Access ODBC DSN Name, Select Filename]
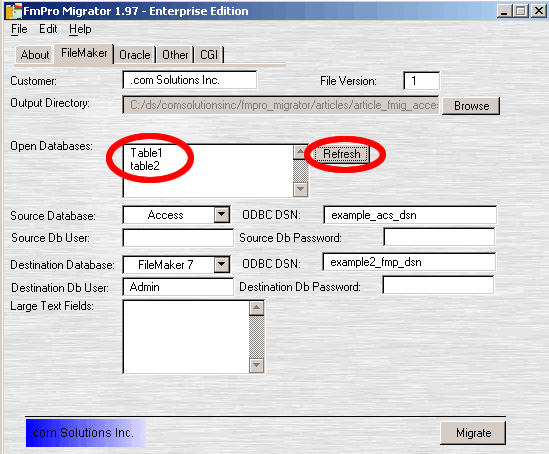
Now that the FileMaker ODBC DSN has been created, FmPro
Migrator can query the Access database to obtain the metadata required
to create migration scripts to FileMaker 7. Click the Refresh button
in FmPro Migrator. The Table1 and table2 Access database tables within
the Example.mdb file will show up in the Open Databases field.
[Figure 8 - Access Database Tables]
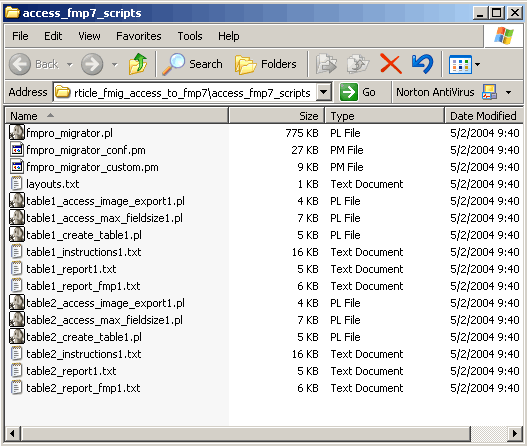
Generate Migration Scripts
Now that a successful connection has been made to the Access database, it is a simple matter to generate the migration scripts and database documentation files by pressing the Migrate button. The result of this process is the list of migration scripts shown below which will be created within the output directory.
[Figure 9 - Generated Access to FileMaker 7 Files]
If these scripts are not created, select the Status Window menu item from the FmPro Migrator File menu. The Status Window will display info about any problems which occurred during the file generation process.

[Figure 10 - FmPro Migrator Status Window]
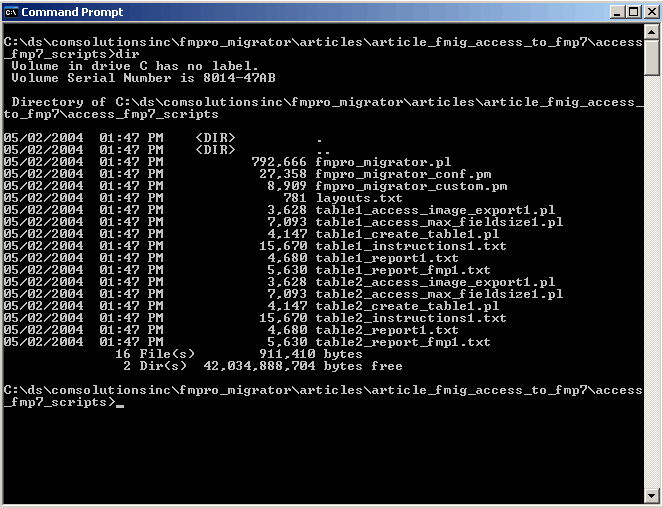
There are 6 files created for each Access database table during the migration process, but we will only need to use the 3 files which are described in Table 3.
| Filename | Description |
| table1_instructions1.txt | This file contains detailed instructions concerning the migration process and is customized for the Access database table which is currently being migrated. |
| table1_report_fmp1.txt | This report file shows the structure of the Access database table, including the names and types of fields, along with how they will be renamed when creating the new FileMaker 7 table. |
| table1_create_table1.pl | The Perl program which creates the FileMaker 7 database table via an ODBC connection. |
[Table 3 - Migration File Descriptions]
Preparing to Create the FileMaker 7 Table
Create a new database in FileMaker 7 on Windows or open an existing
database file. Your migrated Access table will be created within this
new FileMaker 7 database file. For this article, a new FileMaker 7 database
named fmp7_newdb has been created.
Since we will be making an ODBC connection to FileMaker 7, enable the ODBC/JDBC Sharing Companion for all users of this new FileMaker 7 database.
 |
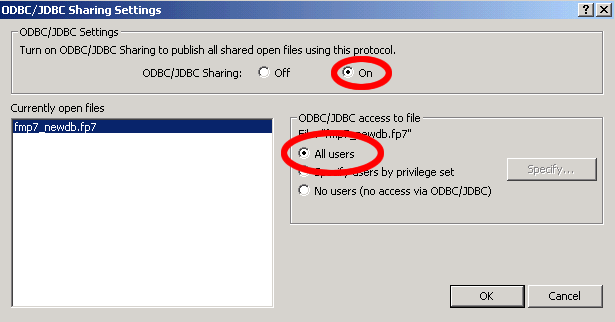 |
[Figure 11 - Enabling FileMaker 7 ODBC/JDBC Sharing]
Open the Windows Data Sources (ODBC) Control Panel to
create a new FileMaker 7 System DSN to match the default ODBC DSN name
used by FmPro Migrator. Click the System DSN tab, then click the Add
button.
[Figure 12 - Create New FileMaker 7 DataSource]
Select DataDirect 32Bit SequeLink 5.4 as the driver for
the new FileMaker 7 data source, then click the Finish button.
Note: Do not select FileMaker Pro as the driver, because the
FileMaker Pro driver is only used for the older versions of the FileMaker
database.
[Figure 13 - Select DataDirect 32Bit SequeLink 5.4 Driver]
Enter the name of the ODBC DSN in the first field. This
name should exactly match the ODBC DSN name which was entered into the
ODBC DSN field for the Destination Database within FmPro Migrator.
Fill in the SequeLink Server Host (127.0.0.1), and SequeLink Server
Port (2399) fields as shown in the image below.
Note: The operational features of the FileMaker 7 ODBC Driver
are very different from previously shipped FileMaker ODBC drivers. The
DataDirect SequeLink FileMaker driver included with FileMaker Pro 7
only permits ODBC connections to be made to a local FileMaker 7 database
running on the same computer. This is why the SequeLink Server Host
field must be filled in with the TCP/IP address of 127.0.0.1 or the
hostname "localhost". The feature of allowing external computers
to make an ODBC connection to a FileMaker 7 database is reserved for
the FileMaker Server 7 Advanced product.
Click the “...” button to the right of the Server Data Source
field, then select the name of the new FileMaker 7 database (fmp7_newdb).
Click the Ok button.
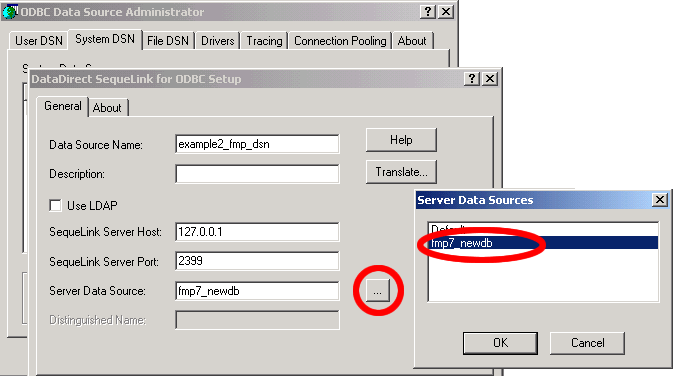
[Figure 14 - Enter SequeLink Driver Parameters for FileMaker 7]
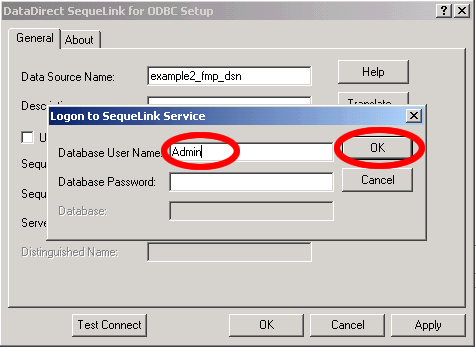
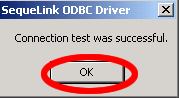
In order to verify that a connection can be made to the FileMaker 7 database, it is a good idea to test the ODBC connection before attempting to use the new ODBC DSN. DataDirect has provided a helpful Test Connect button within their driver setup window which will enable testing of ODBC database connectivity.
Click the Test Connect button shown in Figure 15 to verify
that a connection can be made to the new FileMaker 7 database.
Enter Admin as the username, with no password, then click the Ok button.
Click the Ok button to close the test results dialog box.
Note: If the connection test fails, verify that ODBC/JDBC sharing
is turned on and that an older version of FileMaker is not running with
the Local or Remote Data Access Companion plug-ins enabled.
 |
 |
[Figure 15 - Test FileMaker 7 ODBC DSN]
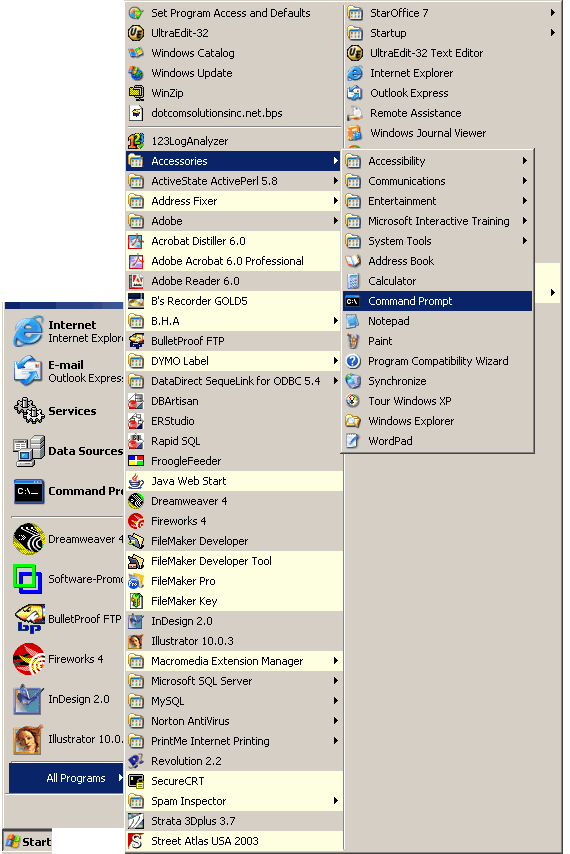
Open the Windows Command Prompt by selecting Start >
Programs > Accessories > Command Prompt.
Use the cd command to navigate into the folder of generated scripts.
 |
 |
[Figure 16 - Opening Windows Command Prompt]
Creating the FileMaker 7 Table
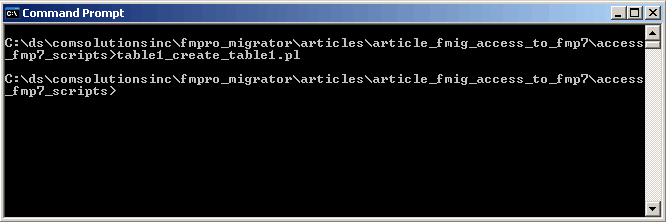
FileMaker 7 includes new functionality which enables developers to create new database tables through the use of SQL commands. There is no command line interface included with FileMaker 7 for issuing SQL commands to the database, but SQL commands may be sent to the database while connected to FileMaker 7 through an ODBC connection. FmPro Migrator generates a table creation script as a Perl program which makes an ODBC connection to FileMaker 7 to send the table creation SQL command to the FileMaker 7 database. Table creation SQL scripts are created for each individual table within the original Access database. This article will show the creation of just the first Access table in the FileMaker 7 database, a table named Table1.
Type the following command in the Command Prompt window
to run the table1_create_table1.pl Perl script to create the
new database table in the FileMaker 7 database.
table1_create_table1.pl
If the program runs successfully, no message will be printed on the
screen and the new table will be created within the FileMaker 7 database.
[Figure 17 - Creating New FileMaker 7 Table]
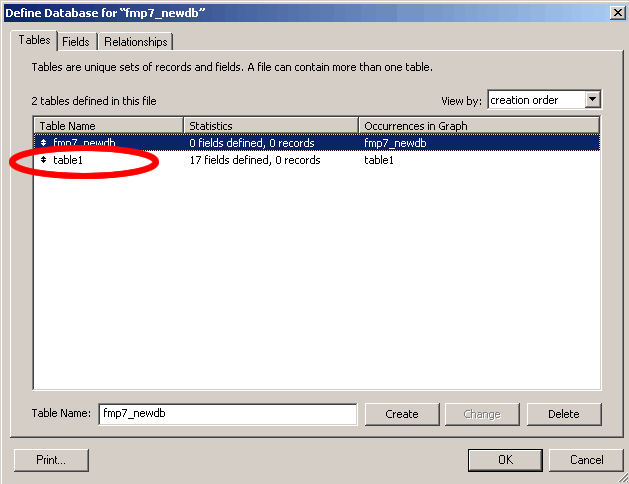
It is a good idea to verify within FileMaker that the
new table has been created properly. This can be done by looking for
the new table within the Tables tab of the Define Databases window.
The new table named table1 will be displayed within this window
in addition to the empty table named fmp7_newdb.
[Figure 18 - Verifying New FileMaker 7 Table]
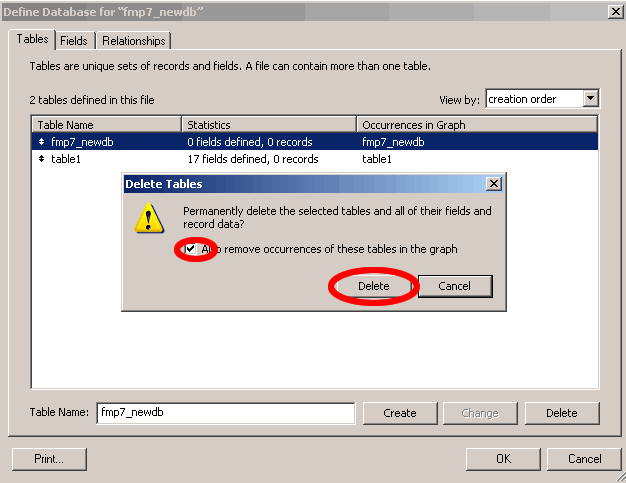
A table named fmp7_newdb (containing 0 fields) was created when the FileMaker 7 database was originally created. This table is no longer needed - so it can now be removed from the database. When deleting a table from FileMaker 7, it is generally a good idea to also remove it from the relationship graph at the same time. If you try to re-create a new table through an ODBC connection with the table still referenced on the relationship graph then the create table command will fail.
[Figure 19 - Deleting FileMaker 7 Placeholder Table]
Migrating Data From Access to FileMaker
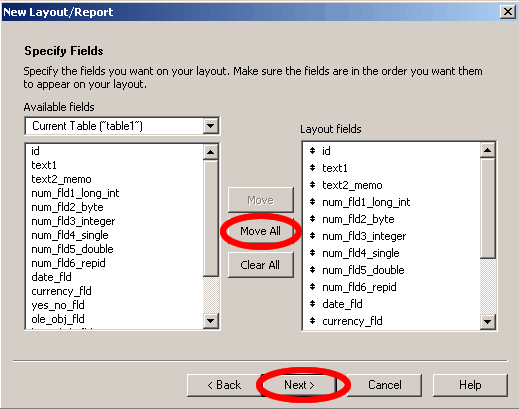
Since the new table1 FileMaker 7 database table was created via an ODBC connection, FileMaker 7 did not automatically create a layout for the table as it would have done if the table had been created manually. In order to import data from Access to FileMaker 7, it is necessary to have a layout associated with the newly created database table so that FileMaker will know where the data should be imported. This new layout for the table1 FileMaker 7 database table needs to contain all of the fields within this new table.
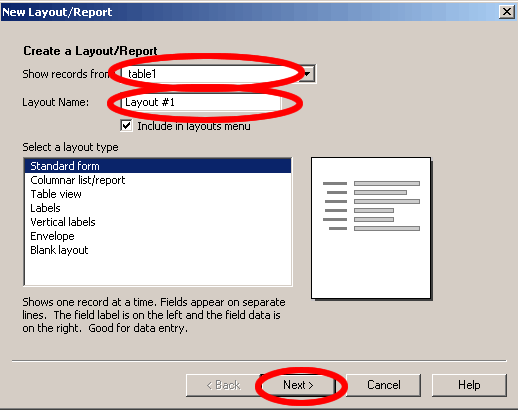
After switching to Layout mode in FileMaker 7, Select New Layout/Report... from the Layouts menu. Select table1 as the table to show records from, change the layout name if desired. Click the Next button.
Click the Move All button to include all field names on
the new layout. Click the Next button.
Select the Layout Theme, then click the Finish button.
 |
 |
[Figure 20 - Create New FileMaker 7 Layout]
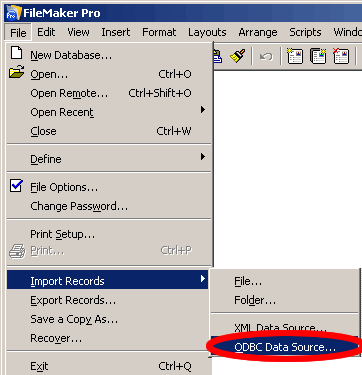
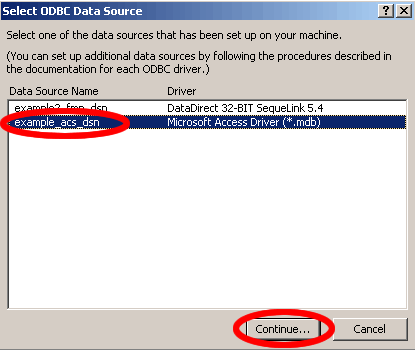
Once the layout has been created, the data can be imported from Access to FileMaker 7 through an ODBC connection between the databases. Use the previously created example_acs_dsn Access ODBC DSN to connect with the Access database from FileMaker 7. Select Import Records > ODBC Data Source..., then select the example_acs_dsn within the FileMaker 7 Select ODBC Data Source dialog, click the Continue button.
 |
 |
[Figure 21 - Import Data From Access to FileMaker 7 - ODBC DSN Selection]
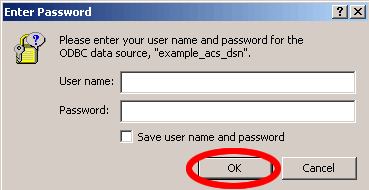
FileMaker 7 will then prompt for Username and Password
information required for logging into the Access database. With this
example Access database no login information is required, so just click
on the Ok button.
Note: It is also possible to specify Username and Password information
within the Access ODBC DSN. If the Access ODBC DSN has been configured
in this manner then it will still not be necessary to enter the Username
and Password info into this dialog box.
[Figure 22 - Access Database Username/Password Dialog]
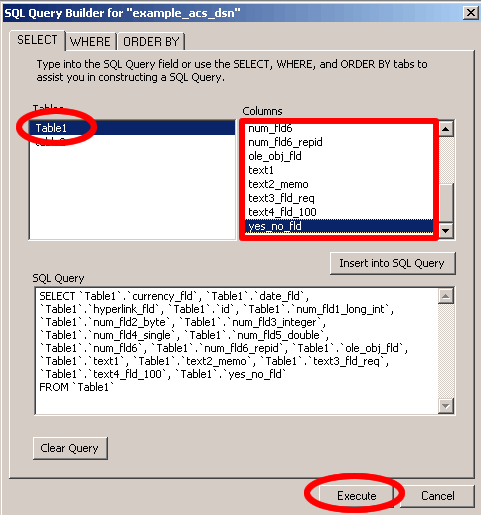
FileMaker 7 then presents a SQL Query Builder dialog box which helps with the creation of the SQL command to import data into the new FileMaker 7 table. Select Table1 from the Access database, then add each of the columns into the SQL Query by double-clicking on each column name. Click the Execute button.
[Figure 23 - FileMaker 7 SQL Query Builder]
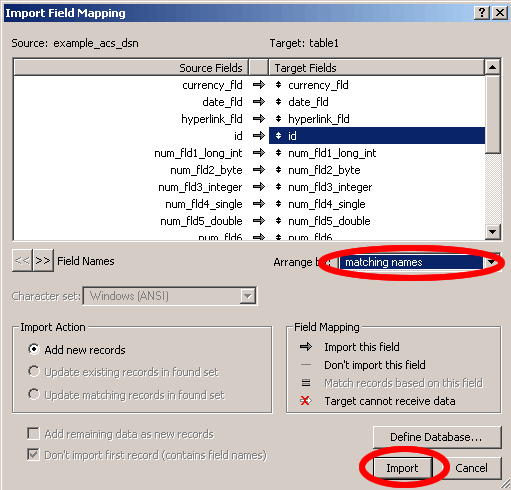
The last step of the data import process is the Import Field Mapping dialog. Selecting the matching names menu item from the Arrange By menu will generally do a good job of automatically matching field names between databases. Any field names which don't match automatically can also be matched manually in this dialog. Click the Import button.
[Figure 24 - FileMaker 7 Import Field Mapping]
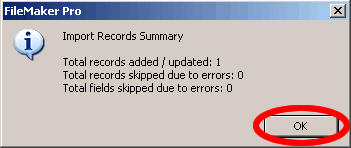
FileMaker will import all of the records, followed by the display of the Import Records Summary dialog. This dialog will show if any records were skipped during the import process. If records were skipped, check the validation options selected for each field to determine if any constraints were violated. A common cause of skipped records includes having FileMaker 7 fields configured with the "Not Empty" attribute. If a particular field is empty in the Access database and its validation attribute is set to "Not Empty", then the entire record will be skipped when it is imported into FileMaker 7. Click the Ok button to close the Imports Records Summary dialog box.
[Figure 25 - FileMaker 7 Import Records Summary]
The imported Access data can now be viewed and edited in FileMaker's Browse mode.
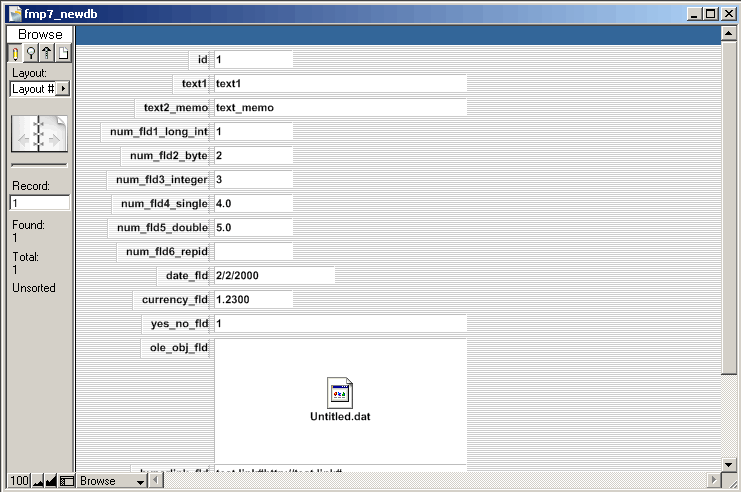
[Figure 26 - Browsing Imported Access Data Within FileMaker 7]
Conclusion
FileMaker 7 introduces over 100 new features, including the ability to automate the creation of FileMaker 7 database tables via an ODBC connection. This new feature now makes it possible to automate the table creation aspect of an Access to FileMaker 7 migration project, which has never before been possible with FileMaker. FileMaker 7 developers can leverage the many benefits available with FileMaker 7 in order to migrate Access databases to FileMaker 7 and provide their customers with the improvements in capacity and usability we have come to expect from the FileMaker product line.
![]()
![]()